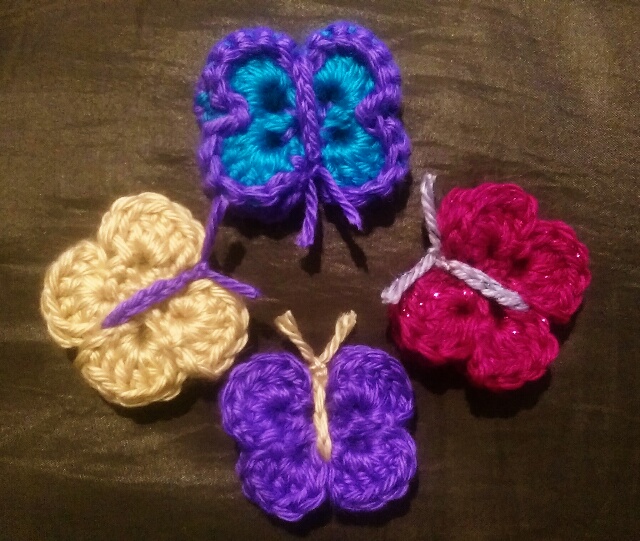
Butterfly Kisses
![]()
Pattern by Colleen Hays with YarnWars.com
![]()
Supplies:
Yarn – Worsted (any yarn of your choice- I used Caron Simply Soft for mine)
Hook – I used G & H for my butterflies, you can use whatever hook size you choose to achieve the size you are looking for.
Blunt needle
Scissors
Techniques Used:
Magic Circle
Double Crochet
Treble Crochet
Slip stitch
FULL VIDEO AVAILABLE HERE (Crochet along for the Butterfly Kisses!)
Pattern (Pattern for large butterfly is just past the small pattern)
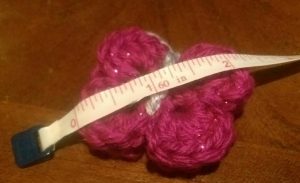
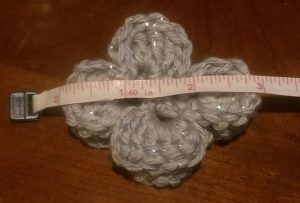
Small butterfly measures approximately 2 ¼”
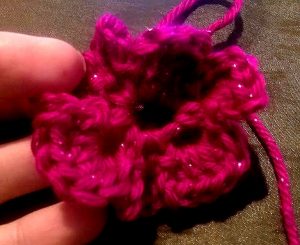
- Make a magic circle, *ch 3, sc into circle* repeat 7 more times for a total of 8 loops, slip stitch into the 1st loop made. Pull magic circle, but not completely tight. It will resemble a small flower.
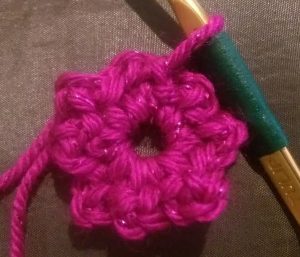
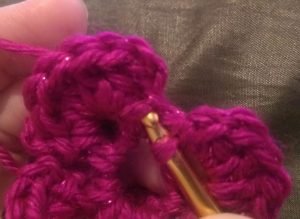
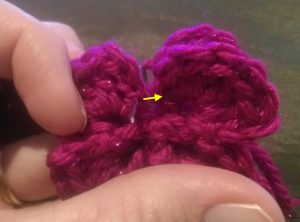
- Ch 3, work 5 dc into loop you just slip stitched into, slip stitch in same loop after 5th dc worked. *slip st into next loop, ch 3 work 5 dc, then slip st into same loop* repeat ** until you have worked a slip stitch, ch 3, 5 dc, slip stitch into each of the 8 loops around. End with a slip stitch into the same as the beginning chain space (pictured below).
Finish off leaving about a 4” tail, pull your center circle closed as much as possible, hide beginning tail around the magic circle.
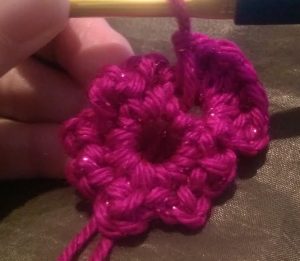
Is your “flower” looking like a finagled twisty mess right now? Good! You are on track!
The “petals” naturally want to flip back, you want to just slightly manipulate it so that you have 4, now wings back to back with each other, as explained more in next step.
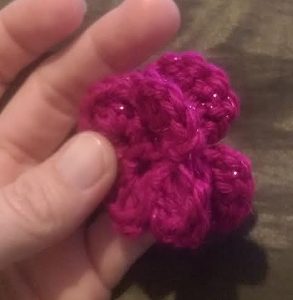
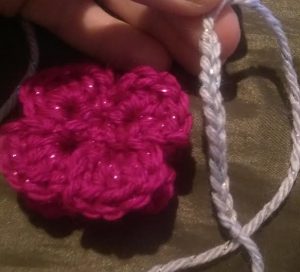
- Fold your butterfly in half back to back (wrong sides together) so each wing has another behind it and your “flower” now resembles a butterfly and now use the remaining tail to tack the two sides together, also working a couple of times across the top gap of the butterfly as pictured below. FO and set butterfly aside.
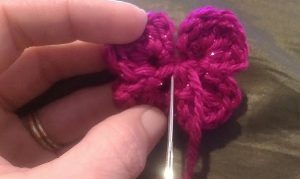
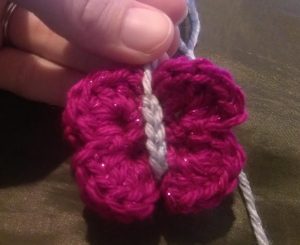
- Ch 12 (you may have to adjust chain count depending on size of butterfly), wrap your chain from front to back of butterfly just to where the top and bottom knots of your chain are meeting at the top of your butterfly, barely. (see picture below) Once you have the chain sized properly, tie the 2 ends of the chain together and clip on the top of the tails to create your butterfly antennas. (see pictures below for a better understanding)
Large Butterfly (Refer to pictures above if needed)
Large butterfly measures approximately 3”
- Make a magic circle, *ch 4, sc into circle* repeat 7 more times for a total of 8 loops, slip stitch into the 1st loop made. Pull magic circle, but not completely tight. It will resemble a small flower.
- Ch 4, work 5 treb crochets into loop you just slip stitched into, slip stitch in same loop after 6th treble worked. *slip st into next loop, ch 4 work 5 treb crochet, then slip st into same loop* repeat ** until you have worked a slip stitch, ch 4, 5 treb, slip stitch into each of the 8 loops around. End with a slip stitch into the same as the beginning chain space.
Is your “flower” looking like a finagled twisty mess right now? Good! You are on track!
The “petals” naturally want to flip back, you want to just slightly manipulate it so that you have 4, now wings back to back with each other, as explained more in next step.
- Fold your butterfly in half back to back (wrong sides together) so each wing has another behind it and your “flower” now resembles a butterfly and now use the remaining tail to tack the two sides together, also working a couple of times across the top gap of the butterfly as pictured below. FO and set butterfly aside.
- Ch 12 (you may have to adjust chain count depending on size of butterfly), wrap your chain from front to back of butterfly just to where the top and bottom knots of your chain are meeting at the top of your butterfly, barely. (refer to pictures above for small butterfly) Once you have the chain sized properly, tie the 2 ends of the chain together and clip on the top of the tails to create your butterfly antennas. (see pictures above for a better understanding)
There you have it! A 3D Butterfly to use as an adorable embellishment on any of your projects!

I hope you have enjoyed this Butterfly Kisses pattern! The butterflies work up so quickly and are so fun for just about any project as an embellishment or even as a main portion of your project! I would love to see your creations!
You are welcome to come join us at our community on Facebook at: http://www.facebook.com/groups/yarnwars where not only will you make new friends that share in your love of yarn from around the world, but you can find great free patterns, crochet & knit, join in on the contests and mini-challenges we hold at YarnWars & show off your creations with the group!
I would also like to invite you to Subscribe at YarnWars.com so that you are alerted to any of our new free pattern & contests. Be the first to know by subscribing FREE today!
This pattern is being offered free to the public for creation purposes. Selling this pattern is strictly prohibited, altering or modifying this pattern for distribution purposes is strictly prohibited, this does not mean you cannot change the pattern for your own personal use! You may not change the pattern to distribute or share it as your own in your community or any other venue. Whatever you choose to do with your end product is your choice, gift share or other =)
There was a lot of time and effort that went into creating this pattern with video to make available free to the public. If you plan on sharing this pattern with your group, members or friends please refer to the link to YarnWars.com with the following: http://www.yarnwars.com as the original designer of this pattern. Thank you so much for your interest in my pattern!

ON YOUR OLAF THE SNOW YOU NEED TO SHOW EXACTLY HOW TO ATTACH THE FEET SO THAT THE FIRST TIME MAKERS UNDERSTAND HOW TO DO IT. THIS IS JUST AN F.Y.I. THANKS FOR THE IDEA AND THE PATTERN.
Hi Connie! Thank you =) I know that the Olaf video was not the greatest, it was actually my first video pattern tutorial, so not all that professional either .. lol.
Attaching can be a painful part of Amigurumi, there are so many videos out for tips on attaching, it really is a matter of what gets the job done in the least visible manner.
I hope in the near future to be able to completely recreate the Olaf videos to make them more clear, less gabby 😉 and all around easier to navigate. Thanks so much for your interest in my pattern! =)