Hello fellow yarners! I hope your day is going great and I hope I can make it even better with this fun new FREE Crochet Frisbee Pattern!
This crochet frisbee is, of course soft & perfect for a fetching pup or tot! Simple, quick and safe for droolers and teethers alike!

So a little bit behind my need for a crochet frisbee.
A few weeks ago, we adopted a dog from a shelter. Cute as can be but even at 2 yrs old he is sooooo PUPPY! Exxxxxhausting.
It was not my intention to bring home a puppy, I was looking for an adult companion dog for my other adult dog Maggie.
Copper, the name of our new friend, was having a very difficult time adjusting to the shelter, as most dogs would, I’m sure, but he was depressed, stopped eating. Thankfully he was rescued by a lady in the area, from the shelter, but she desperately needed to find Copper a forever home. When I heard his story, it was a no brainer. I’m happy to say he is thriving and has a new big brother to wear off energy with.

Unfortunately, his big brother is taken from him every morning by a big yellow box with wheels  , so he needs another playmate… Guess who?! Copper is insanely full of energy, puppy play is an understatement, and after learning that copper was a fetcher, obviously, a Frisbee was born! It’s really as simple as that.
So, originally, this pattern was created for a canine friend, however, it is too kid-friendly not to include for a little human friend , and with the following quick and easy pattern, you will soon have a fun little softy toy that truly will fly through the air with the greatest of ease!
I hope you enjoy! You can find the pattern terms below at the end of the pattern 
FULL VIDEO TUTORIAL AVAILABLE FOR THIS PATTERN
Materials
- Recommended Yarn – Cotton
- J hook- 6mm
- Stitch marker (optional)
- Blunt needle
- Scissors
- Stuffing
Techniques
- Magic Circle or Chain loop
- Hdc – half double crochet
- Slip Stitch
- Inc – Increase: Working 2 stitches within 1 stitch.
- BLO – Back loop only. Work the back loop of the stitch alone.
- FLO – Front loop only. Work only the front loop of the stitch.
Medium Frisbee Pattern: (As Seen in Video Tut) 8-9” [Other size information detailed towards end of pattern]
- Begin by creating a magic circle OR chain 4 and join with 1st chain made to form a loop. Ch 2, work 10 hdc into circle/loop.
- Ch 2, work 2 hdc into same as beginning chain, then work an inc (increase- 2 hdc) into each stitch to end. Join with slip stitch into 1st hdc made. (20)
- Ch 2, work inc into same as beginning chain, 1 hdc in next, *inc into next st, 1 hdc in next* Repeat **, join to 1st (30)
- Ch 2, work inc into same as beginning chain, 1 hdc in next 2 st, *inc into next st, 1 hdc in next 2 st* Repeat **, join to 1st (40)
- Ch 2, work inc into same as beginning chain, 1 hdc in next 3 st, *inc into next st, 1 hdc in next 3 st* Repeat **, join to 1st (50)
- Ch 2, work inc into same as beginning chain, 1 hdc in next 4 st, *inc into next st, 1 hdc in next 4 st* Repeat **, join to 1st (60)
Beginning Front Outer Tube area
- Ch2, work inc into flo into same as beginning chain, 1 hdc into next 2 st (flo), *inc into next st (flo), 1 hdc into next 2 st (flo)* Repeat **, join to 1st hdc (80)
- Ch2, work 1 hdc into each st around to end, starting with beginning chain space. Join to 1st hdc (80)
- – 11. Repeat round 8
Turn your frisbee to the opposite side.
You will see the back loop only ridge around start of outer portion:
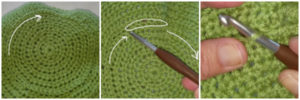
You will now work the back side of your project the same as you did the front side, only you will be working into the back loops only (BLO) of the stitches we worked FLO in.
Join your yarn into the loop around same chain space area on other flap as shown in photos above, then work rounds 7 – 11 of the outer tube area of the pattern above.
Do not finish off yet, leave working yarn on project after round 11 of 2nd flap made.
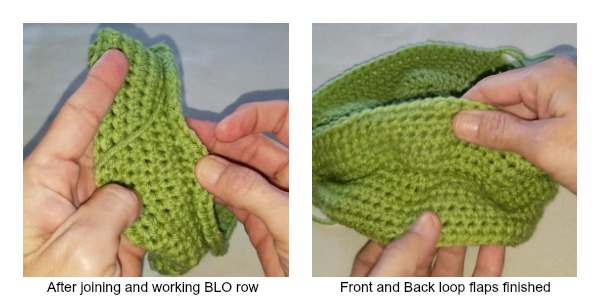
Close 2 flaps together and ch 1 from that ending tail area. Begin slip stitching flaps closed at top inserting hook into next st through to stitch on opposite flap. Continue slip stitching into 10-15 stitches, STOP & STUFF. Slip stitch into the next 10-15 stitches, STOP & STUFF. Continue working in this fashion around entire outer tube of project to end. After stuffing your last portion of the outer section, finish off & hide tails.
Any questions on the pattern section above can be answered by watching this section of the video: [WATCH HERE]
Generously stuff your slip stitch sections to end. Make sure not to over stuff to where the fill is bulging or under stuff so there is flattening in areas).

Small Frisbee 6-7”
For Small size frisbee, you will want to stop working your inner circle after round 4. You will then pick up from round 7 and finish rest of pattern to complete. This will mean that after completing your increase round 7, you will have a total of 60 stitches now and to the end of project.
Large Frisbee 10-11”
For Large size frisbee continue with the pattern below after round 6 above:
- Ch 2, work inc into same as beginning chain, 1 hdc in next 5 st, *inc into next st, 1 hdc in next 5 st* Repeat **, join to 1st hdc. (70)
- Ch 2, work inc into same as beginning chain, 1 hdc in next 6 st, *inc into next st, 1 hdc in next 6 st* Repeat **, join to 1st hdc. (80)
After completing round 8, you will continue working section for Medium Frisbee labeled Beginning Front Outer Tube area you will be picking up from round 7 under the medium frisbee pattern and finish in same fashion.
Your final stitch count for the large Frisbee will be 100.
FULL VIDEO TUTORIAL AVAILABLE FOR THIS PATTERN
Pattern Tips
–For less of a bulky outer tube, eliminate your last round of hdc from each flap section.
–For an even more durable Frisbee, create 2 inner circle areas, stack and stitch together before beginning flaps. Then work 1st flap into full stitches of 1 circle, and 2nd flap into full stitches of other circle instead of FLO and BLO.
Pretty easy stuff huh?!
Now, you can make several for your toddler or canine friend in different colors and be all set for trips to the park, the beach, playing in the yard, heck! This one is even safe for in house play! ????
I would love to see your new frisbees! Join us at YarnWars on Facebook or Like our YarnWars Facebook Page and comment in the Frisbee post with the picture of your work up!
Subscribe to my YouTube channel! You’ll be the first to know when a new YarnWars pattern video is released!
Follow us on:
Have a perfectly wonderful day & happy yarning, my friends!
Pattern Terms
Hello everyone! My name is Colleen Hays, owner of YarnWars.com, I created this pattern to be offered free to my yarn crafting friends near and far. This includes anyone with a passion for yarn in whatever medium, crochet, knit, loom and more. Whatever you wish to do, be it sell or gift your final workup of this pattern, you are welcome to do so, I just ask that you give a small credit in some way to YarnWars for the design. Please do not distribute copies of this pattern instead, please refer others to YarnWars.com website to pick up their own free copy. Referring others to my website is what enables me to continue creating free patterns for the community and offering venues for yarn-tistas to come together.
Thank you so much for your interest in my pattern and appreciation for the terms laid out.


No Responses