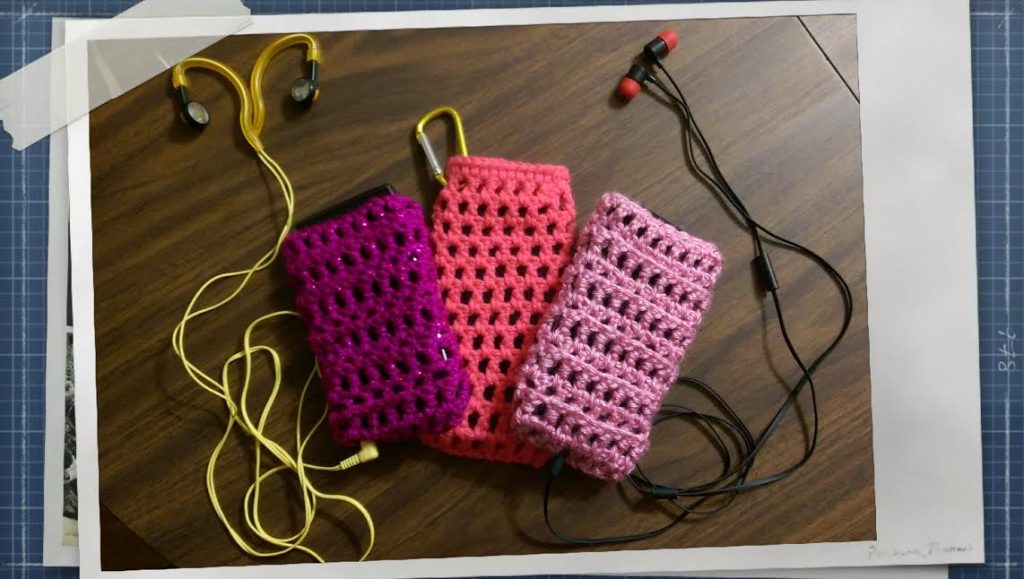
This is a Colleen Hays – YarnWars.com original, FREE Pattern
The following pattern will produce a case that will fit up to approximately 6” x 3” snuggly. (For size adjustments, remember to start your beginning chain at an odd number. Smaller phones, maybe chain only 11 or 13 to start, instead of 15.)
Supplies
H hook- for smaller phones, you might find simply moving down to an F or G hook and working the same pattern would be just enough!
Yarn – to achieve the proper size, I worked both a Bernat Super Value and a Caron Simply Soft with similar results. Cotton can also be used.
Blunt Needle for hiding tails
Stitch Marker – Only needed for 1st few rounds
Scissors
Other suggestions:
-Beading incorporated into your work, could be a fun detail to add.
-Buttons are always a fun addition to projects, they come in all shapes and sizes!
-Tassles along the ledges or just across the bottom, for instance, incorporating some eyelash yarn woven through each layer with a blunt needle after completing your case could add the perfect finishing touch!
-Flowers, butterflies and other fun appliqués to make things really sparkle!
Crochet Terms & Techniques Used:
Ch– chain
Sp– space
Hdc– half double crochet
Dc– double crochet
Extdc– extended double crochet (Yarn over, insert hook into stitch, draw yarn through (you will have 3 loops on hook), yarn over, pull through first loop on hook, yarn over, draw through 2 loops on hook, yarn over, pull through last 2 loops on hook.)
Fpextdc– front post extended double crochet (Working around each post or stitch from previous round, yarn over & insert hook from the front to the back and around the extended dc from prev round, yarn over, complete by working an extdc.)
Sl st– slip stitch
This pattern includes a FULL video tutorial. If you are struggling with any of the written portion of this pattern, please feel free to crochet along with me! =)
Pattern:
1. Chain 15
2. Work dc into 3rd chain from hook, ch 1, skip next ch, *dc into next, ch 1, skip next ch, dc into next* Repeat ** to end
(Using images below to help you start and complete this round) Ch 3. With track now facing you (img 1) work backwards around each post (ex. Img 2), making ext dc down to last post in track. (I say track because it reminds me a bit of a train track!)
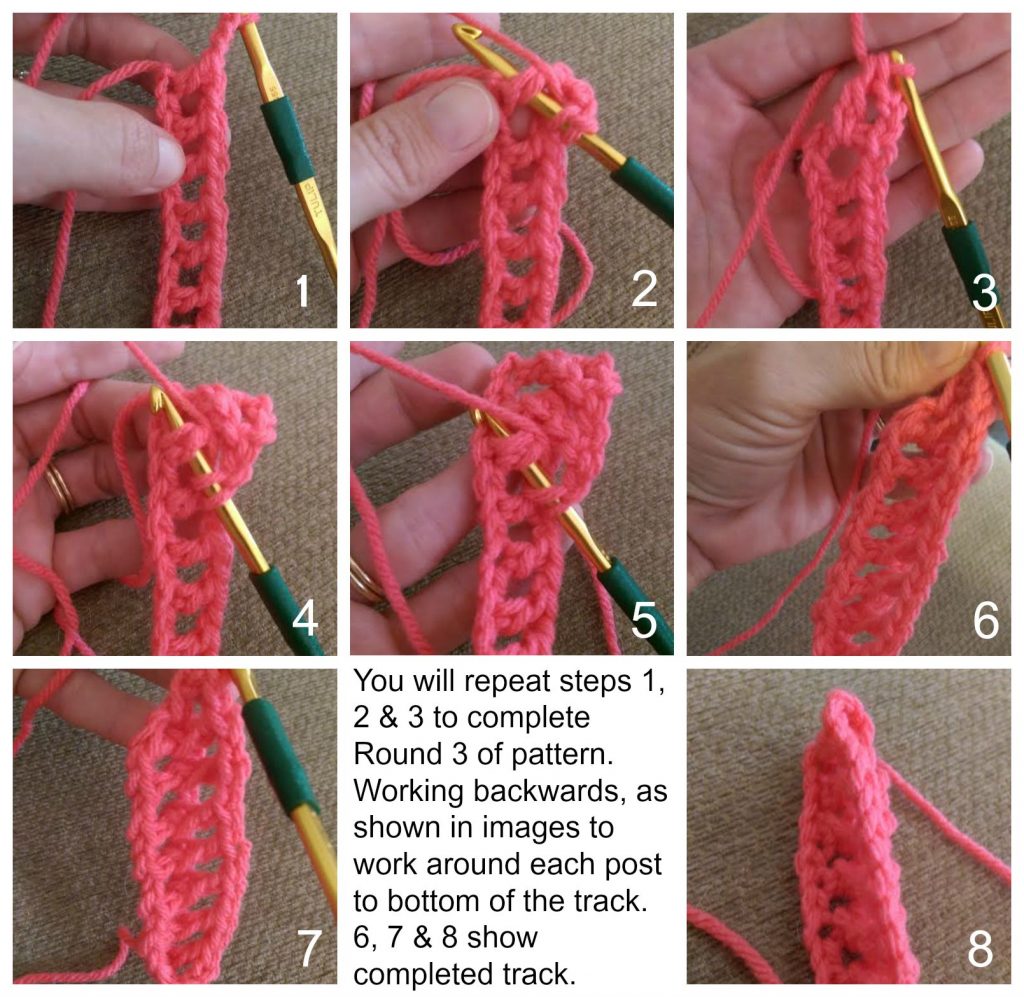
4. Slightly turn project so you are working around in normal fashion (see image 9 for visual understanding of round 4). Place stitch marker. Ch 1, work ext dc into the 1st chain space, *chain 1, ext dc into nxt ch sp* Repeat ** to end. Place stitch marker for next round.
Image 9– Notice in image above, where tail is on bottom. The part of image that is circled, is the final stitch from your previous round, the arrow below that is the chain space you will work your 1st stitch for round 4 into, the curved arrow at the bottom shows the direction you will work round 4.
![]()
Note before moving on: This pattern can be made 1 of 2 ways!
If you prefer a simple mesh look, as in the middle cell phone pictured under the title of this pattern, after you work your final ext dc for round 4, you will chain 1 and repeat row 4, working in continuous rounds without joining until you reach desired height. You will then finish the same as the finish for the layered pattern.
![]()
For the layered cell phone case on the left and right of the picture at the top of this pattern, you will continue to round 5.
5. Ch 1, work front post extended double crochet (fpextdc) around 1st ext dc from previous round. *Ch 1 work fpextdc around nxt ext dc skipping chain space in between* Repeat ** around to end.
(At this point you will see your 1st layer formed!)
6. – ? You will now alternate between rows 4 & 5, making sure to chain 1 after your very last stitch made in each round, and making sure not to join at all until you reach your desired height. When you have reached the height of your case, you will simply chain 1 after last stitch made, and work a slip stitch into the next chain space.
![]()
Rubber Band Attachment
To work a rubber band into the top, you can either follow the video tutorial on this part by Clicking Here (clicking for video will take you directly to the rubber band section of video for the mesh version- it is the same for layered version as well.) or if you prefer written, you can follow round 7 explanation of placing rubber band. Rubber band top is optional – alternatively, you can create a crochet draw string chained rope to weave through for closure as well!
(Choose a rubber band that is between 30-40% smaller than the size of the opening of your case.)
7. After slip stitching in round 6, chain 2. hold rubber band in place at top of case and working over rubber band as you would work over tails to hide in a project, you will work a hdc into ea chain space and stitch around the top to the end, slipping into 1st hdc to finish off this round.
If done correctly, when completed, you will not see your rubber band, it will cinch the top of the bag so it is capable of holding your phone inside the case without slipping out.
For in depth visual on working in your rubber band for this final round, again, there is a video tutorial available here!.
From this point, you can create a handle for your bag, or simply use a carabiner, as shown in full video, to attach to the inside of your purse, or other.
![]()
Many different ways to get creative with this project, I hope that if you get a moment that you will share your own creative ideas on this project with us in our YarnWars Facebook Group! Our Facebook group is a wonderful group of crochet and knitting friends from around the world! So full of encouragement, support and amazing talents. I am always so amazed at the awesome creations I get to see each day from the group members!
If you would rather just stay up to date and informed on new FREE patterns, contest & challenges, feel free to either Subscribe to our website by entering your email address in the top right subscribe box when you enter the site, or Like us on Facebook at our YarnWars Page!
I hope you enjoyed this pattern, stay tuned for so much more to come from YarnWars! We are having so much fun, serving you, FREE, everyday!
![]()
Terms of this pattern are as follows:
This pattern is being offered free to the public for creation purposes.
Selling this written or video pattern is strictly prohibited, altering or modifying this written or video pattern for distribution purposes is strictly prohibited, this does not mean you cannot change the pattern for your own personal use! You may not change the pattern to distribute or share it as your own in your community or any other venue. Whatever you choose to do with your end product is your choice, whether you choose to gift or sell your finished product.
There was a lot of time and effort that went into creating this pattern to make available free to the public. If you plan on sharing this pattern with your group, members or friends please refer to the link to YarnWars.com with the following: http://www.yarnwars.com and/or Colleen Hays as the original designer of this pattern.
YarnWars Group on Facebook for the FREE downloadable and printable pattern.
Chaysie Crochet on YouTube for fun FREE crochet along projects!
Make sure to Like us on Facebook!
Thanks everyone!!