Every designer has that pattern, that they just fall in love with and the Ramblin’ Rose crochet scarf ranks as one of my favorites of all of my designs to date.
I would have to say, of all of my patterns, the Ramblin’ Rose, Stormy Waters and Wonderland Garden scarves are my favorites. I’m not sure what my obsession is with scarves!
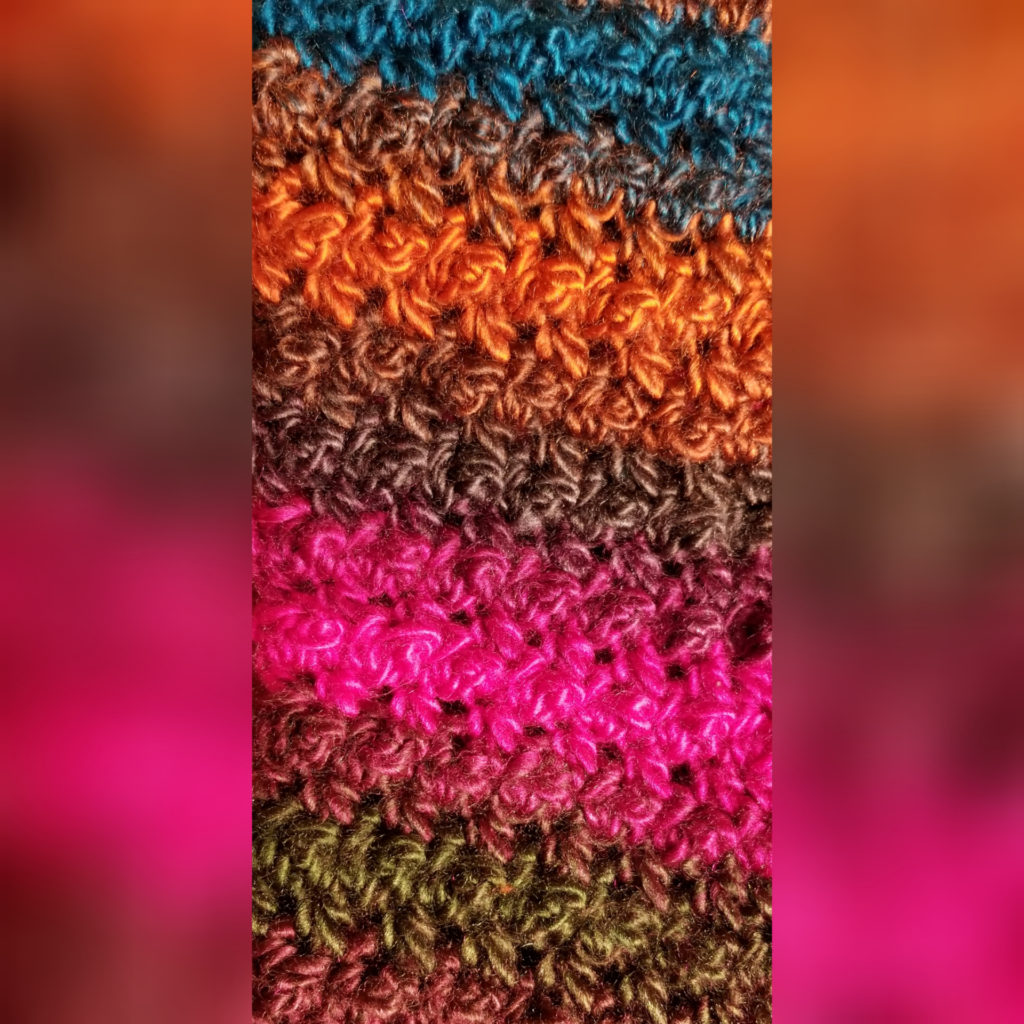
I am thrilled with how the combination of these stitches came together to form this piece! The picture does NOT do it justice. (For a better view, check out the video)
When I’m looking for a pattern to work up from another yarntista, I look at the stitches and think to myself, will I stay interested in this pattern? Is there enough diversity in the stitches, how long will this project take to complete… yes, these things actually go through my head.
I love a challenge and I need a challenge to avoid the dreadful backup of WIPs, however, at the same time, I also like short and sweet, not necessarily to the point though. I do sometimes get a little twisty with my stitches. It makes it more exciting and sometimes gives you a look that you never dreamed it would!
You probably won’t ever see me designing a lot of blankets, it’s just not my thing, I envy those who can just whip up blanket after beautiful blanket, but I just can’t stay with it long enough. I design smaller versions such as scarves, cloths, granny squares and then do my best to expand that for you to create those bigger projects if you so choose.
Interesting, fresh and user friendly! That’s what I hope that I’ve portrayed in the Ramblin’ Rose crochet scarf. I enjoyed working it up and with only 2 rows of stitches to master, I truly hope you will find it to be a simple and enjoyable pattern as well.
I’ve provided a full video on this pattern to aid in areas that may be confusing, but hopefully, you will find it to be a pretty simple pattern after only a few rows.
If you make one, I’d LOVE to see it! Come join us in our YarnWars Facebook group and tag me in your finished workup! Don’t forget, all of my patterns can be found in the group’s Files tab in pdf format to print out for free!
Have an amazing day my friends! Scroll just a bit further to view the pattern =)
~Colleen
FULL VIDEO TUTORIAL AVAILABLE FOR THIS PATTERN
Materials
- Yarn – LionsBrand Landscapes or RedHeart Unforgettable – Lion Brand Scarfie also works up nicely with this pattern.(Look for the number 4)
- J hook – 6mm was used in video.
- Stitch marker (optional)
- Blunt needle
- Scissors
Techniques & Terms
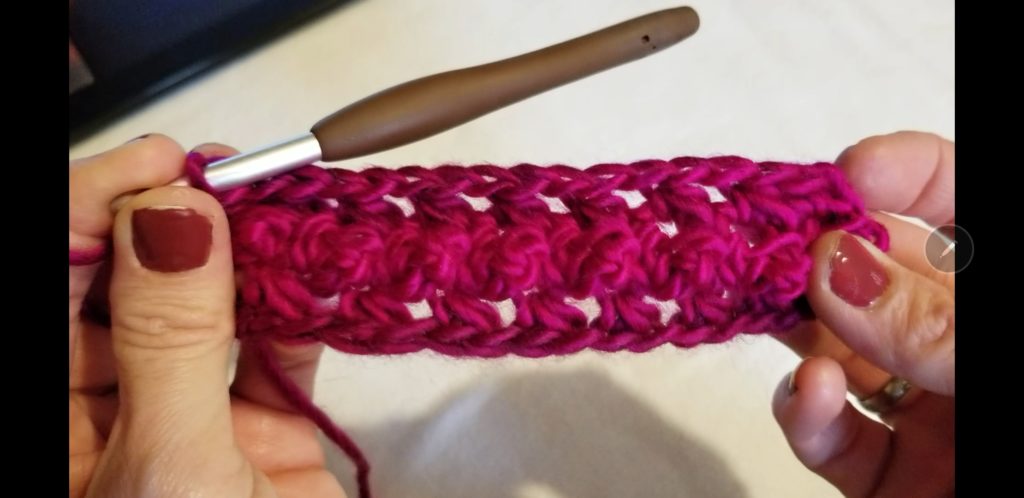
- Hdc – Half double crochet – Yarn over, insert hook into stitch, yarn over and draw through a loop. Yarn over once more and draw through 3 loops on hook.
- Hdsc2tog – (Combined Hdc and Sc over 2 stitches) For the sake of releasing this pattern, I will describe the stitch and until I know the technical name for it, if there is one, it will be identified as hdsc2tog. Yo, insert hook into stitch, yo, pull through; insert hook directly into next stitch (without yo first), yo, pull through; Yo, draw hook through all 4 loops on hook. [As you see, it is neither a hdc2tog (pulling through 5 loops) nor a sc2tog (pulling through 3 loops)]
- RBS (Rose bud stitch) – Hdc into st, yo twice, insert hook into same space as hdc, yo pull through stitch, yo pull through 2, yo pull through 2, insert hook directly into next st, yo, pull through, yo and pull through all 3 loops on hook, give a little tug. You have just created a rose bud. (You should see a defined raised bump. If you don’t, you may need to … give it a little tug again!)
- Sl st– Slip stitch
- Ch – chain
Ramblin’ Rose Scarf Pattern:
{Chain 6+1 then increments of 2 thereafter for whatever project you are making}
1. ch 17
2. hdc into 2nd ch from hook, over next 2 st, work *hdsc2tog + ch 1* Repeat ** until you have only 1 ch left. work hdc into last st. (IMPORTANT- do not forget to chain 1 after your final hdsc2tog before you create your final hdc. Your stitch count WILL be off.)
3. Chain 2, RBS over 1st 2 stitches (Described in Technique section above), *RBS across remaining stitches to end.
Repeat rows 2 & 3 until your scarf is the length you desire.
Tips!
-If creating an infinity, you will want to end your scarf with a repeat of row 3 to help keep a consistent and seamless flow. ALSO make sure to leave approx 8 – 10″ tail to stitch the two sides together.
-If creating a regular scarf, end your project with a repeat of row 2 to end the project the same as you began.
-Optional infinity *INVISIBLE* close is explained in the final part of the video tutorial. It can also be found in a more detailed, stand alone video, click here!
-If you are simply making a wider scarf, it is easier to add increments of 2 beyond the multiples of 6, however, for blankets or larger projects, I would suggest getting as close as possible simply using multiples of 6 as tension could be different for everyone. (Don’t forget to add 1 for your foundation chain!)
FUN SUGGESTIONS FOR THIS PATTERN!
Make a throw blanket! (Approx 50 x 60) 29 x 6 + 1 (175 foundation chain)
Just some annoying equation information.. In case you wanted to know for larger projects:
I made a scarf starting with a foundation chain of 17. The scarf was approx 5” wide. A throw blanket is approx 50 x 60, so using 50” as my guide, I know I need a total of 10 scarf widths, right? 17 x 10 = 170
Now I need to see how many times 6 goes into 170 (remember, I still have to add 1 chain for my foundation) Multiplying 28 x 6 gets me 168 + 1 for a total of 169 foundation chains. Just for safety sake, I’ll add another 6 to make up for possible tighter stitching or any other possible miscalculation… (YIKES! Hope not!)
Hopefully the above info will help you if are wanting to create an even bigger blanket. You can google blanket sizes for larger blankets and use the above method to figure out your starting chain based on a blanket size.
Pattern Terms:
I created this pattern to be offered free to my yarn crafting friends near and far. This includes anyone with a passion for yarn in whatever medium, crochet, knit, loom and more. Whatever you wish to do, be it sell or gift your final workup of this pattern, you are welcome to do so, I just ask that you try to give a small credit in some way to YarnWars for the design. Please do not distribute copies of this pattern instead, please refer others to YarnWars.com website to pick up their own free copy. Referring others to my website is what enables me to continue creating free patterns for the community and offering venues for yarn-tistas to come together. All of my patterns are also available for download in the Files tab of our YarnWars Facebook group.
Thank you for your interest in my pattern and your appreciation for the terms laid out! ♥


No Responses