FULL VIDEO TUTORIAL AVAILABLE!!
Pattern is available for download in pdf format in our Facebook group (Link is below)
Pattern Terms
This pattern is being offered free to the public for creation purposes. Selling this pattern is strictly prohibited, altering or modifying this pattern for distribution purposes is strictly prohibited. This does not mean you cannot change the pattern for your own personal use! You may not change the pattern to distribute or share it as your own in your community or any other venue. Whatever you choose to do with your end product is your choice. There was a lot of time and effort that went into creating this pattern to make available free to the public. If you plan on sharing this pattern with your group, members or friends, please refer to the original designer of this pattern Colleen Hays with YarnWars.com. Link to pattern please, do not post copy of this pattern to your website, group, or any other venue.
Thank you so much!
________________________________
Remember those fun & easy to work up Mary Jane Baby First Booties? Why not pair up with a set of these perfectly adorable new Patty Cake Baby First Mittens for the next baby shower gift, or perhaps the next craft fair! There is nothing more precious than a baby and so why not deck out that little one with the newest FREE pattern from our up and coming Baby Cakes Collection! Only available at YarnWars!
Supplies needed:
–G, F & D hook (G for glove body, F for Cherry, D for frosting and wrist ties)
-Yarn – 3 different color choices (I used RedHeart First Baby Steps, white for frosting, and light grape for mitten & red RedHeart Super Saver for the cherry.)
-Blunt Needle
-Stitch Marker
-Scissors
Techniques Used in Pattern:
Sc – Single Crochet– (insert hook into stitch, draw yarn back through, yarn over, draw through both loops on hook)
Hdc – Half Double Crochet– (Yarn over, insert hook into stitch, draw yarn through, yarn over, draw through all 3 loops on hook.)
Sl St – Slip Stitch– (Insert hook into stitch, yarn over, draw yarn through stitch then through 1st loop on hook.)
Blo – Back Loop Only– (Work only in the back loop of your stitch)
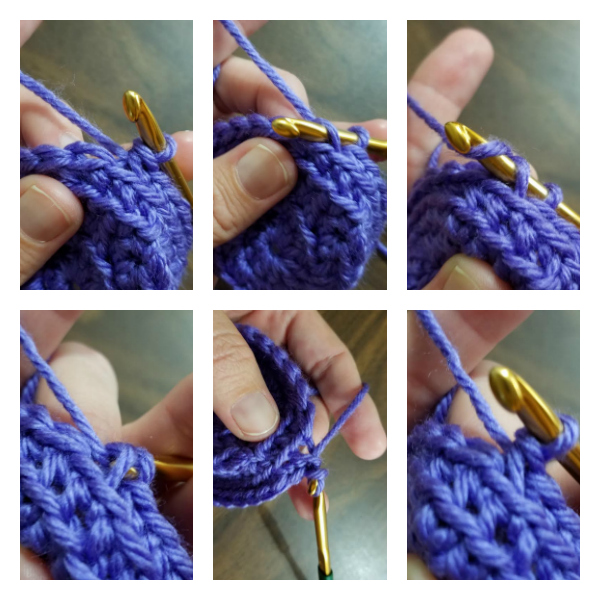
Blsb – Back Loop Slip Behind– (Working the back loop of a stitch, insert hook behind & into loop, yarn over, draw through both loops on hook.) (Diagram below)
Mc – Magic Circle – This is a prep step to work your stitches through in the beginning of a project. There is not a very simple way to explain this, there is, however, a video tutorial available for this technique.
If you are not comfortable with the MC, you can alternatively start your project by chaining 3, slip stitch into the 1st chain worked, then work your beginning stitches into the circle made.
Cluster – Working over 2 stitches, insert hook into 1st stitch, yarn over, draw through (you will now have 2 loops on hook), insert hook into 2nd loop, yarn over, draw through (now there are 3 loops on hook), yarn over, insert hook back into the 2nd stitch worked, yarn over draw through, draw hook through all loops on hook then chain 1.
Decrease – Working over 2 stitches, insert hook into 1st stitch, yo, draw yarn through, insert hook into 2nd stitch, draw yarn through. Draw yarn through all 3 loops on hook. (This pattern uses single crochet decrease.)
(Blsb) Back Loop Slip Behind Stitch Diagram:
Mitten Pattern
Pattern is worked in continuous rounds. No joins, no chain ups through the growth of the mitten.
Grab your G hook! (Drop to F hook if you crochet loosely)
- MC, work 10 hdc into circle. (10)
- Increase in each stitch around (2 hdc in ea stitch around) (20)
- In back loop only, hdc Increase in 1st st, 1 hdc in nxt, *increase in next, 1 hdc in next* Repeat ** (30)
- 1 blsb in each stitch around (30)
- 1 sc in ea stitch around BLO (30)
- 1 blsb in each stitch around (30)
- 1 sc in ea stitch around BLO (30)
- 1 blsb in each stitch around (30)
STOP and take this opportunity to hide your tails and work your frosting, cherry fluff and cherry into place (Directions further in the pattern to work frosting, cherry fluff and cherry).
You can finish the mitten portion first and easily work the cherry and frosting round, however, your project will be quite bulky at this point and a bit cumbersome to have to flip inside out to hide all of your tails.
- 1 sc in ea stitch around BLO (30)
- 1 blsb in each stitch around (30)
- 1 sc in ea stitch around BLO (30)
- 1 blsb in each stitch around (30)
- 1 sc in ea stitch around BLO (30)
- 1 blsb in each stitch around (30)
- 1 sc in ea stitch around BLO (30)
- Join your frosting color yarn for cluster trim of mitten, ch 1, working over your beginning 2 stitches, create your first cluster (Cluster instructions in technique section of pattern above).
- Chain 1, work sc into the 1st cluster stitch, *ch 1, sc into next cluster st* Repeat ** to end, join with slip stitch into 1st sc made. (Cluster directions above)
–END OF MITTEN ROUND–
SIZING… (F hook may be necessary for looser stitches)
It is very easy to increase this project to suit a larger size, or a smaller size for that matter.
In rounds 2 & 3 we are increasing the size of this pattern.
If you are looking to make a size larger for a toddler, simply add 1 more increase round to this project before moving on to round 4.
Example after round 3 you would do the following:
-In back loop only, hdc Increase in 1st st, 1 hdc in nxt 2 stitches, *increase in next, 1 hdc in next 2 st* Repeat ** (40)
-Continue to round 4 of the pattern
For a large mitten:
-In back loop only, hdc Increase in 1st st, 1 hdc in nxt 3 stitches, *increase in next, 1 hdc in next 3 st* Repeat ** (50)
-Continue to round 4 of the pattern.
Frosting
D hook:
You will be working into the front loops that we did not work into in rounds 3 and 5 of mitten.
Front loop Diagram for Frosting:
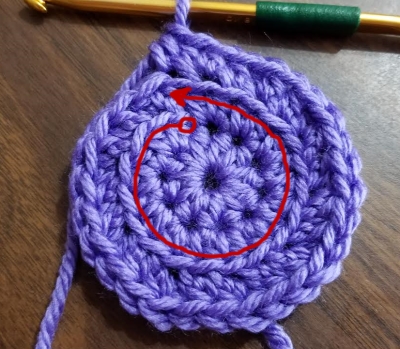
As you can see in the diagram above, I have drawn a red circle just below the front loop stitches you will work your frosting into. The circle on the one end is the starting point to work your frosting into; the arrow marks the direction you will go and the last stitch for round 3 front loops stitches.
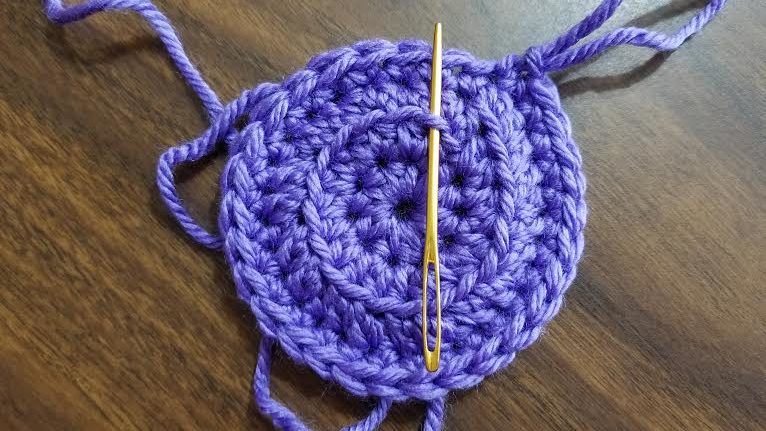
Insert hook into the 1st front loop stitch from round 3 of mitten as shown in picture below: (Insert hook, not needle =) ), grab your frosting colored yarn and pull through that loop, then chain 1, work 3 sc into ea loop, working over your beginning tail if possible. (NOTE: If it starts becoming too tight of a space to work 3 sc into ea loop, you can break it up a bit by working maybe 3 sc, then 2 sc in next or working a couple of loops with 3 sc, then skipping the next loop.) Whatever works for you to achieve the look of fluffy frosting =) At end of frosting, insert your frosting tails into the wrong side and work in your tails.
Cherry Fluff Frosting
This is the frosting section that the cherry sits directly on top of. Using a D hook along with your frosting colored yarn, leave yourself approximately 4-6” tail:
- Ch 2, work 6 sc into the 1st chain made. Do not join.
- Work 5 dc directly into the 1st sc and then the remaining 5 sc. Join.
You will want to attach the cherry on top of this cherry fluff before attaching the fluff to the mitten. Cherry pattern below.
Cherry
F Hook. Leaving approximately 4-6” tail:
- Ch 2, work 6 sc into the 1st chain made. Do not join.
- Work 2 sc (inc) into each stitch around. (12)
- 1 sc in each stitch around. (12)
- Decrease 6 times over 2 stitches, (shown in video) (6)
Finish off leaving a 4-6” tail.
Use your tail to close up the final gap of cherry top by weaving in and out of the remaining 6 stitches from round 4. This will be the bottom of your cherry to be attached to the cherry fluff, so it is not important to be perfect in your close of the cherry.
OPTIONAL – You can stuff your cherry if you wish, I did not stuff mine, but if you choose to, I would stuff after completing round 4. It will be a small space, but the cherry will not require much stuffing, it is very small and you can push it through the hole with your hook and mold it in as you go.
FINAL:
Attach your cherry to your fluff, attach fluff to top of mitten, hide tails on inside of mitten.
Continue to round 9 of mitten if you chose to finish your frosting and cherry before completing mitten =)
____________________________
That, my friends completes this fun pattern and I hope you have enjoyed it!
Thank you so much for your interest in my pattern!
Visit us on Facebook to share your work ups of the Patty Cakes Baby’s First Mittens along with other projects you’ve been working on!
Subscribe to my channel on YouTube! Lots of new free patterns around the bend!
Sign up at YarnWars.com for FREE patterns, contest announcements and more!
![]()