Hello! Colleen Hays here, owner of YarnWars.com. I created this pattern to be offered free to
my yarn crafting friends near and far. This includes anyone with a passion for yarn in whatever
medium, crochet, knit, loom and more. Whatever you wish to do, be it sell or gift your final
workup of this pattern, you are welcome to do so, I just ask that you try to give a small credit in
some way to YarnWars for the design. Please do not distribute copies of this pattern instead,
please refer others to YarnWars.com website to pick up their own free copy. Referring others to
my website is what enables me to continue creating free patterns for the community and
offering venues for yarn-tistas to come together. All of my patterns are also available for free
download in the Files tab of our YarnWars Facebook group.
Thank you for your interest in my pattern and your appreciation for the terms laid out! ♥
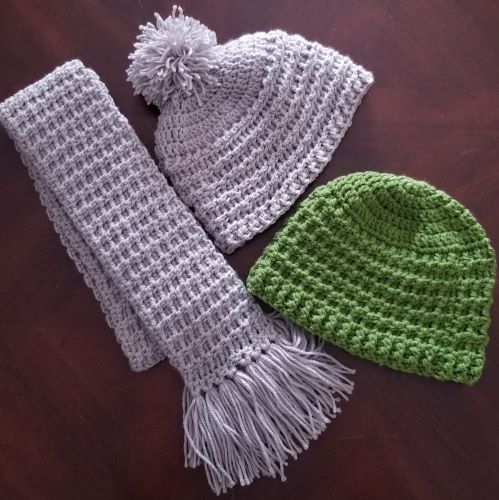
Some of you may remember the classic song Little Boxes, you know, Little houses made of ticky tacky? This was the motivation behind this hat as well as the scarf pattern that came before it! Ladies, gents, you are going to love the simplicity of this design along with its boxy texture! if you are looking for that quick and easy Christmas gift, this hat will be a winning number! Not just for your recipient, but for you too! 2 easy 4 words!
FULL VIDEO TUTORIAL AVAILABLE FOR THIS PATTERN
Materials
- Yarn – 4 weight was used in the work up of this hat pattern.
- J hook
- Stitch marker (optional- not necessary)
- Blunt needle
- Scissors
Techniques & Terms - Hdc – Half double crochet – Yarn over, insert hook into stitch, yarn over and
draw through a loop. Yarn over once more and draw through 3 loops on
hook. - Fsphdc – Front stitch post hdc – Yarn over, insert hook in one stitch, around
back and through the next, yarn over pull through, yarn over, pull through
all 3 stitches on the hook. (Not to be confused with the front post hdc
where you work around the post of the stitch) See video for description - Fpdc – Front post double crochet – (Yarn over, insert hook in, from front,
around and back through to front of double crochet from previous row.
Yarn over, pull hook through stitch, yarn over pull through 2 loops, yarn
over, pull through last 2 loops on hook.) - Bpdc – Back post double crochet – (Yarn over, insert hook in, from back,
around and back through to back of double crochet from previous row.
Yarn over, pull hook through stitch, yarn over pull through 2 loops, yarn over, pull through last 2 loops on hook.) - Sl st- Slip stitch
- Ch – chain
Pattern:
- Create a magic loop or chain 4 and join with 1st chain made to form a loop.
- Ch 2, work 12 dc into the loop. (Chain up will not count as stitch.) Join to 1st dc
made. - Ch 2, work 2 dc into same chain space, then work 2 dc into each stitch around.
Join to 1st dc made (24) - Ch 2, work 2 dc into same chain space, then work 1 dc into next stitch. 2 dc into next st, 1 dc into next Repeat ** to the end, then join with 1st dc made. (36)
- Ch 2, work 2 dc into same chain space, then work 1 dc into each of the next 2
stitches. 2 dc into next st, 1 dc into each of the next 2 stitches Repeat ** to the
end, then join with 1st dc made. (48) - Ch 2, work 2 dc into same chain space, then work 1 dc into each of the next 3
stitch. 2 dc into next st, 1 dc into each of the next 3 stitches Repeat ** to the
end, then join with 1st dc made. (60)
Sizing Information:
*This ends the crown area of the hat. If you are making a smaller hat or a larger hat, you will need to
adjust your crown area above.
For example. If you need a size smaller than 19-21″, you will want to eliminate round 6 and then
continue to round 7 below.
If you are wanting to make a larger hat than 19-21″, you will want to add an increase round by doing the
following:
Ch 2, work 2 dc into same chain space, then work 1 dc into each of the next 4 stitches. 2 dc into next st, 1 dc into each of the next 4 stitches Repeat ** to the end, then join with 1st dc made. (36)* - Ch 1, hdc into the same chain space, work front stitch post hdc around same
chain space and next stitch, then work hdc into stitch you came through with the
front stitch post, fsphdc around next 2 stitches, then hdc into the 2nd stitch in your fsphcd Repeat ** to end, join to 1st hdc made. Turn your work - Ch 1, hdc into the same chain space, work fsphdc around the next 2 stitches,
then hdc into 2nd st in your fsphcd (this time we won’t start our 1st fphdc into the
same chain space.) fsphdc around next 2 stitches, hdc into 2nd st in your fsphcd
Repeat ** to end, join to 1st hdc made. Turn your work
Repeat round 8 until you have reached the desired length for your piece.
Remember for an adult sized beanie, you will be looking at approximately 8-9″ to
just cover the ears.
Baby length: 5″ – 6.5″ | Child length: 7″ – 7.5″ | Adult length: 8″ – 9″
For crown sizing:
Child: 6.25” | Teen: 6.75” | Adult: 7” – 7.25”
Make sure you are turning your work after each round in the Little Boxes pattern
part of this, NOT in the crown section.
Optional ribbed rim for hat.
Once you have completed your pattern above, work the following for a more
ribbed rim:
Working on the right side of pattern,
Ch 2, work fpdc around the 1st hdc from previous round, bpdc around next dc,
fpdc around next stitch, bpdc around next Repeat ** to end, join to the first fpdc
made.
Ch 2, work fpdc around the 1st fpdc, bpdc around the next bpdc, fpdc around the next fpdc, bpdc around the next bpdc Repeat ** to end, join to the first fpdc
made.
Repeat the above for the ribbed band until suffice.
I only worked 2 rounds for my hat in video.
FULL VIDEO TUTORIAL AVAILABLE FOR THIS PATTERN
I really hope you enjoyed working this pattern! The Little Boxes hat and scarf
patterns offers such a simple yet fun boxy design, and BONUS it is super quick
and easy! I really hope if you give it a try, you will show me your beautiful work!.
Make sure if you have any questions at all to take a look at the video tutorial
linked above. Please also keep in mind, the video was created for a beginner
crocheter so if you are someone with enough crochet knowledge, be forewarned,
I teach this pattern at a beginner level to help with all aspects of the pattern
process. I answer all comments on videos so make sure if you have a question you
post it in the video comments or go into our Facebook group and tag me (Colleen
Hays).
I will ALWAYS do my very best to help!
Again, I would love to see your finished work-up or any of your other creations!
Come join us over at YarnWars on Facebook or Like our YarnWars Facebook Page
and tag me (Colleen Hays) so I can check it out!
Subscribe to my YouTube channel! You’ll be the first to know when a new
YarnWars pattern video is released!
Happy yarning friends!
~Colleen


