Easter Jelly Bean Pursket & Egg Hunt Bag
(Continued)
Basket Part (Working your jelly bean rows =)
Join with your first basket color:
- Start this row by chaining 3, skip 1st st, work 1 hdc into next st, [ch 1, skip next st, 1 hdc into following st, ch 1]. Repeat [] then join into the beginning ch 3 space.
Join next basket color:
- Ch 2, work 1 hdc into next ch 1 space (you will be working right into the spaces, not into actual stitches), [ch 1, work 1 hdc into next ch 1 space], repeat [], join to the 1st chain 2 space.
Again, if you are alternating between 2 colors, from this point you can just drop your last worked yarn and pull your other strand from previous row back in to join. This will eliminate a TON of tail hiding, so just drop the last color worked and pull up your previous color to join for your next row. It looks very tidy when you finish on the inside…See?!=)
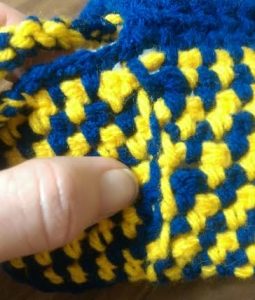
Neat and tidy inside seam
Continue working your jelly bean rows up by repeating row 11.
When you have completed your rows, and you are happy with your finish height, after your join, bring your last color yarn back up, and using BOTH colors of yarn, chain approximately 35 chains, or however long you wish your basket handle to be. Attach to the opposite end with a slip, and for added security, slip into next stitch, chain 1 to knot and finish off.
(I made a total of 18 jelly bean rows for my girl’s pursket, 14 for my boys hunter bag.)
Pull Ribbon for Pursket (optional)
This is the ribbon you will make to pull the pursket closed.
Start by taking 1 of the colors you will be working into the pattern and chain anywhere from 60-70 chains. You can measure around the basket to make sure you are going to be able to wrap it with some excess.
After your first row of chains, join your 2nd color. Sc in 2nd ch from hook and then into every stitch after to end.
Join final color and repeat last step.
FO, Take the tails from both ends of ribbon and tie together to knot, as shown in pictures below:

Do not join bows, butterflies, or anything to ends of ribbon until your ribbon is wound in place.
To wind the ribbon through, begin at 2nd row down from top, find your middle basket placement, simply wind in and out of every other stitch around until you meet the other end of the ribbon to the beginning of the ribbon, you can somewhat see what it looks like from an inside view of the basket below: 
I make sweater sets for the local hospital’s newborns and that bunny would be a perfect applique. Now, to find the pattern.
http://www.yarnwars.com/5-minute-bunny-applique-pattern/
I’m so sorry Kathryn! I had the pattern up in the menu “Free Patterns” on YarnWars so I hope you were able to find it. I had originally linked the image on the page but for some reason, it’s not working. My apologies and if you ever struggle to find one of my patterns, the search function should take you right there. Thanks so much for the heads up!! =)