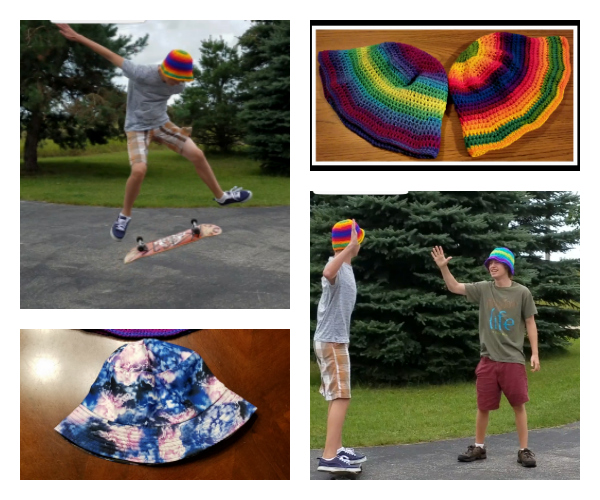
What can I say friends? I saw an opportunity and I had to take it. I modeled this crochet bucket hat after my sons other hats and I’m pretty darn pleased with how they turned out!
This was not only an opportunity to play with the Red Heart Super Saver Stripes, which I really REALLY love, but also an opportunity to save myself a bit of money. 
Unfortunately, my store only had a couple of skeins left, obviously a popular choice around here, but I will definitely be grabbing a few more RHSS Stripes as soon as they’re available!
My son has 2 other store bought bucket hats that he wears at the skate park to keep the sun off his head… total skater and he’s always leaving things at the skate park so I thought it was time for me to work up a crochet bucket hat or 2 or 3 or 4 to add to his wardrobe.. lol.. I’ll let you all know how that goes over with him =D
For anyone not familiar with the bucket hat, according to Wikipedia , is a head wear designed with a wide and downwards sloping brim. Also known as the session hat, fisherman’s hat or Irish country hat, the bucket hat was a popular high fashion item in the 60’s, so it goes right along with my current vintage fever 😉 (For more vintage from YarnWars, check out the latest Granny Crochet Vest.)
I won’t waste any more time, the pattern is available below; it is available in printable pdf format in the YarnWars Facebook Group Files tab and available in a FULL VIDEO TUTORIAL. If you have any problems or questions, please feel free to contact me here via the About / Contact tab above OR you can also PM me on Facebook either through the group or page. I’m pretty quick to respond. =)
Crochet Bucket Hat Pattern
I, Colleen Hays, owner of YarnWars.com, created this pattern to be offered free to my yarn crafting friends near and far. This includes anyone with a passion for yarn in whatever medium, crochet, knit, loom and more. Whatever you wish to do, be it sell or gift your final workup of this pattern, you are welcome to do so, I just ask that you give a small credit in some way to YarnWars for the design. Please do not distribute copies of this pattern instead, please refer others to YarnWars.com website to pick up their own free copy. Referring others to my website is what enables me to continue creating free patterns for the community and offering venues for yarn-tistas to come together.
Thank you so much for your interest in my pattern and appreciation for the terms laid out.
Full Video Tutorial Available for this Pattern
Materials
- Yarn- The yarn I chose was the Red Heart Super Saver Stripes. The 2 hats displayed in pattern were made with the colors: Parrot and Favorite Stripes. Look for this symbol:

- J hook- 6mm
- Stitch marker (optional)
- Blunt needle
- Scissors
Techniques
- Magic Circle or Chain loop
- Hdc – half double crochet
- Slip Stitch
- Inc – Increase: Working 2 stitches within 1 stitch.
- B2LO – Back 2 loops only. Work the back loop of the stitch together with the loop behind the back loop. [Video Technique]
- FLO – Front loop only. Work only the front loop of the stitch. [Video Technique]
Pattern:
- Begin by creating a magic circle OR chain 4 and join with 1st chain made to form a loop. Ch 2, work 10 hdc into circle/loop.
- Ch 2, work 2 hdc into same as beginning chain, then work an inc (increase- 2 hdc) into each stitch to end. Join with slip stitch into 1st hdc made. (20)
- Ch 2, work 1 hdc into same as beginning chain, inc in next, *1 hdc into next st, inc in next* Repeat **, join to 1st (30)
- Ch 2, work 1 hdc into 1st 2 st beginning with starting chain space, inc in next, *1 hdc into each of the next 2 st, inc in next* Repeat **, join to 1st (40)
- Ch 2, work 1 hdc into 1st 3 st beginning with starting chain space, inc in next, *1 hdc into each of the next 3 st, inc in next* Repeat **, join to 1st (50)
- Ch 2, work 1 hdc into 1st 4 st beginning with starting chain space, inc in next, *1 hdc into each of the next 4 st, inc in next* Repeat **, join to 1st (60)
- Ch 2, work 1 hdc into 1st 5 st beginning with starting chain space, inc in next, *1 hdc into each of the next 5 st, inc in next* Repeat **, join to 1st (70)
- Ch 2, work 1 hdc into 1st 6 st beginning with starting chain space, inc in next, *1 hdc into each of the next 6 st, inc in next* Repeat **, join to 1st (80)
After round 8, you’ve completed the adult size crown for your hat which should measure approximately 7”.

- Ch 2, work 1 hdc into each stitch beginning with starting chain space, B2LO (See above in Techniques for explanation.) Join to 1st (80)
- Ch 2, repeat round 9 once more.

For rounds 11 – 18, you will do the following:
Ch 2, work 1 hdc into each stitch beginning with starting ch sp to end. Work this round normal in both front and back loop of stitch. (80)
Rounds 11-18 should measure approx. 3”. Measuring from front loop ridge in rd 10 to end of round 18 at beginning of start of brim of hat.

If you wish to add to the length of the hat, simply repeat previous round until you reach desired length.
- Ch 2, work 1 hdc into ea st beginning with starting ch sp, FLO. (80)
- Ch 2, work 1 hdc into 1st 7 st beginning with starting chain space, inc in next, *1 hdc into each of the next 7 st, inc in next* Repeat **, join to 1st hdc. (90) (You will work this and future rounds in normal both loop fashion.)
- Ch 2, work 1 hdc into 1st 8 st beginning with starting chain space, inc in next, *1 hdc into each of the next 8 st, inc in next* Repeat **, join to 1st hdc. (100)
- Ch 2, work 1 hdc into 1st 9 st beginning with starting chain space, inc in next, *1 hdc into each of the next 9 st, inc in next* Repeat **, join to 1st hdc. (110)
- Ch 2, work 1 hdc into 1st 10 st beginning with starting chain space, inc in next, *1 hdc into each of the next 10 st, inc in next* Repeat **, join to 1st hdc. (120)
- Ch 2, work 1 hdc into each stitch to end, join to 1st hdc. (120)
Optional finish:
I finished both of my hats with a slip stitch in ea st around to end. This is optional, you can leave it as it and finish off by hiding tails at this point.
Your hat is complete! I really hope you have enjoyed working up my version of the bucket hat, it is simple, quick and you can get insanely creative and colorful with it. I am also really enjoying these Red Heart Super Saver Stripe colors, I’m sure you could have just as much fun with the Bernat Stripes or switch it up and join new colors to your liking!
FULL VIDEO TUTORIAL AVAILABLE FOR THIS PATTERN
Different Sizes
Use the chart below to adjust accordingly to the size you need.
For teen – adult small with a circumference of 20″, eliminate 1 round of hdc from the crown section of the pattern before you begin working down the side of hat with (b2lo). This means the crown of your hat should have 70 stitches from end of crown to start of brim instead of the 80 stitches ended with the adult medium size of 21-22″ worked in the pattern above.
You will continue working the brim from where you left off on increases on the crown, which will be 1 hdc in each of the 1st 6 st, beginning with the starting ch sp, followed with an inc of 2 hdc. You will complete the hat in the exact same fashion as the printed adult pattern only with the adjustment in your stitch count.
That is the ONLY thing you should have to do different, this hat is so simple to alter for size. The same would hold true for a smaller or even larger size hat. Again, check the hat sizing chart below to help you with adjustments for whatever size you are making.
Please note: The chart below shows approximate sizing as each new round of hdc adds approximately 1” to the crown. This will be different working down the length of hat where each new round of hdc adds approximately .5”. This is not a typical hat that will hug snugly around all areas of head so make sure to adjust accordingly to tension as well.
| Age | Circumference
of head |
Length of hat | Crown diameter |
| Child | 18-19” | 7” | 5-6” |
| Teen/Adult Small | 20” | 7.5” | 6” |
| Adult Medium | 21-22” | 8” | 7” |
| Adult Large | 23-24” | 8.5-9” | 8” |
Finding a more accurate hat measurement:
Another way for you to get a closer measurement for your hat because, of course, not all head sizes are alike, follow the formula below:
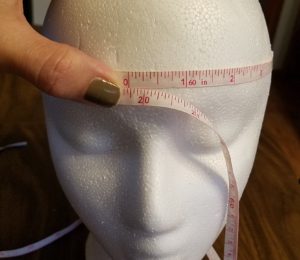
Take your tape measure, wrap around the head over forehead area around total head. In the example below you see the measurement is just below 20”, so we will round up our sizing since we are closer to 20” than 19”.
This size of 20” is the circumference of the head. (See photo below)
Take your 20” measurement and divide that by (pi) 3.14 which gives us 6.36 for our diameter, so we will round that down to 6”.
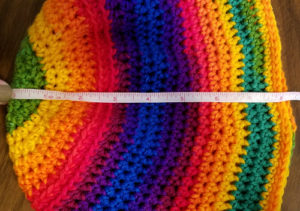
This means we want for the diameter of our hat to be approximately 6”. The photo below shows how you will measure to find your diameter of 6” (The photo shows different size- ignore that.) This is our crown diameter measurement.
This means we will be working a Teen/Adult Small hat.
For the Teen/Adult Small hat, we want a length of approximately 7.5” which is measured from the top center of the hat to the bottom of hat as shown below. (Again, the photo shows a different size- ignore that.)
You should have all you need to determine the size of your hat now =)
_____________________________________________________
I hope you have enjoyed making this crochet bucket hat! Bet you can’t make just 1!  I’ve made 4 already just because it is so quick and such a great no nonsense movie project; I wouldn’t doubt an awesome craft fair seller as well!
Please join us in the group at:
Like us on our YarnWars Facebook Page and comment in the Bucket hat post with the picture of your work up, and / or, join us in the YarnWars Group and show off some of your awesome makes!
Subscribe to my YouTube channel if you prefer video tutorials. You will be the first to know when a new YarnWars pattern video is released. I like to create a video for each of my patterns, so even if you get stuck in the written pattern, you will have a video to refer to!
Follow us on:
Have a perfectly wonderful day my friends!
![]()


Hi. I’m making this hat in a larger size, and I noticed that in the sizing section, you say to multiply the circumference by pi to get the diameter, but I think you may have meant divide.
You are absolutely correct Sami! I did have this on the written pattern so it must have been a slip in the video… my apologies. I haven’t gone into the video yet but will make a note in there.
I appreciate your help! Thank you =)
Hi Colleen – thank you so much for the calculation on figuring out the crown size…I paid $6 on Ravelry for a bucket hat pattern – and she only had one size – so my initial try resulted in a crown that was like a big cap (I didn’t finish it).
Your math definitely helped me get the size I think I need – at least it’s a lot better, so I’m working on the side of the crown now. It’s a bucket hat with a large brim (Frankie Bucket Hat).
The one thing you might want to check is your equation for determining the size of the crown. You have multiply your head’s circumference by pi. It’s actually divide the circumference by pi.
Other than that, I so appreciate your recipe and detailed instructions. You can find me on Ravelry at elaineflo01.
Thank you!
Elaine
Yes Elaine! Thank you, someone else commented on that as well, for some reason I had it to multiply in the video and divide is in the written, so I definitely misspoke on that.
I’m sorry… I need to get in there and make note now.
Thank you for your attention on this!
♥
Thanks! This is a great pattern and I love how you explain how to adjust the size.
Thank you so much Lynne! ♥