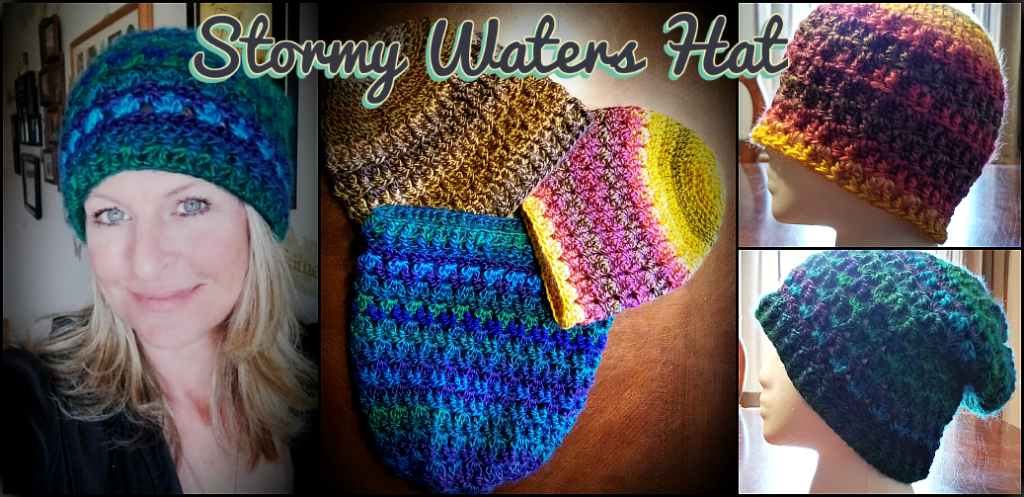
Hello! Colleen Hays here, owner of YarnWars.com. I created this pattern to be offered free to my yarn crafting friends near and far. This includes anyone with a passion for yarn in whatever medium, crochet, knit, loom and more. Whatever you wish to do, be it sell or gift your final workup of this pattern, you are welcome to do so, I just ask that you try to give a small credit in some way to YarnWars for the design. Please do not distribute copies of this pattern instead, please refer others to YarnWars.com website to pick up their own free copy. Referring others to my website is what enables me to continue creating free patterns for the community and offering venues for yarn-tistas to come together. All of my patterns are also available for download in the Files tab of our YarnWars Facebook group.
I had a lot of fun creating the Stormy Waters Hat & I think you are going to love the cushy soft texture of the pattern along with the beautiful, shimmery Lion Brand Landscapes or Red Heart Unforgettable yarn if you choose one of these to work it up. The Stormy Waters hat along with the scarf (Click here for scarf pattern) would make a beautiful gift set for a loved one. It is super quick to work up AND It could be a HOT seller in a craft fair or in your online store!
Thank you so much for your interest in my pattern, my friends, and your appreciation for the terms laid out above.
_________________________________________________________
Materials
- Yarn- I used in video: Lion Brand Landscapes for slouch hat & Yarn Bee Wildstreak for beanie (Color: Teal/Purple) from Hobby Lobby in the video, but another great choice for this pattern would be Red Heart Unforgettable. Look for the 4 weight. (1 skein of Landscapes, Unforgettable or Wildstreak will complete 1 beanie hat minus pom pom if you wished to add one.) If making the slouch hat, you may need a bit more than 1 skein. You can use a different yarn but you may have to adjust your hook size accordingly.
- J hook- 6mm
- Stitch marker (optional)
- Blunt needle
- Scissors
Techniques & Terms
- Mc – Magic Circle (Find Video Here)
- Sc – Single crochet.
- Fpdc – Front post double crochet. (Yarn over, insert hook in, from front, around and back through to front of double crochet from previous row. Yarn over, pull hook through stitch, yarn over pull through 2 loops, yarn over, pull through last 2 loops on hook.) Example of fpdc below.
- Sl st- Slip stitch
- Ch – chain
Fpdc diagram: 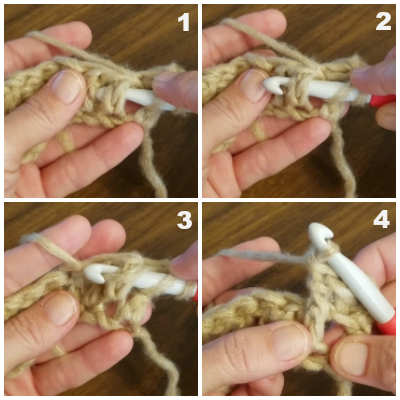
After step 3 in the diagram above, you will complete a regular double crochet.
Beanie Hat Pattern: (Slouch Hat Written Pattern Follows)
CLICK HERE FOR FULL BEANIE VIDEO TUTORIAL
[The following pattern is for an adult size – 18-22″ See other sizing information below.]
- Begin by creating a magic circle (or ch 4 & join to 1st chain made with sl st). Ch 2 and work 12 dc into loop. (Ch up will not count as dc unless otherwise stated in pattern.)
- Ch 2, Work 2 dc (inc) into ea st around beginning with same ch space. (24)
- Ch 2, work 2 dc into same ch sp, 1 dc into nxt st, *inc into nxt, 1 dc into nxt st*, Repeat ** to end with 1 dc in last st. Join to 1st dc made. (36)
- Ch 2, work 2 dc into same ch sp, 1 dc into next 2 st, *inc into nxt, 1 dc into nxt 2 st*, Repeat ** to end. Finish with 1 dc in each of the last 2 st. Join to 1st dc made. (48)
- Ch 2, work 2 dc into same ch sp, 1 dc into next 3 st, *inc into nxt, 1 dc into nxt 3 st*, Repeat ** to end. Finish with 1 dc in each of the last 3 st. Join to 1st dc made. (60)
- Ch 2, work 2 dc into ch sp, skip next 2 st, *work 3 dc into next st, skip next 2 st* Repeat ** to end, join to 1st dc made.
- Ch 2, *fpdc around chain up from previous round, sc in next dc, fpdc around 3rd dc*, Repeat ** for each cluster around to end, join to the 1st fpdc made. (This is the only round you will treat the chain up as a stitch)
- Ch 2, skip 1 st, *work 3 dc cluster into next (make sure that your cluster is being worked into the 2nd dc in the 3 dc cluster from previous round so pattern lines up properly.), skip 2 st* Repeat ** to end. Join with 1st dc made.
- Ch 2, *fpdc around 1st dc, sc in 2nd dc, fpdc around 3rd dc*, Repeat ** for each cluster around to end, join to the 1st fpdc made.
Repeat rows 8 & 9 until you have worked your hat to the length you desire, ending with row 9, once you’ve reached the length to cover the ears continue to round 10 below.
10. Ch 1, hdc into 1st st and every stitch to end, finish off.
ANOTHER OPTION TO FINISH OFF FOR BOTTOM RIM OF HAT CAN BE FOUND BELOW SLOUCH PATTERN
Slouch Hat Pattern:
CLICK HERE FOR FULL SLOUCH HAT VIDEO TUTORIAL
- Leaving approx 12″ tail, ch 63, join to 1st chain made.
- Ch 1, hdc into 2nd ch, then into each ch around (62)
- Ch 3, skip 1st 2 st, *3 dc cluster in next st, skip 2* Repeat until you have 2 stitches left at end of round, skip those 2 stitches, work 2 dc into same as beginning chain space and join into 1st dc made. (The chain up in the beginning of this round will serve as a dc in that final cluster made, only in this round.)
- Ch 2, *fpdc in 1st dc from previous rd, sc in next dc, fpdc in 3rd dc* Repeat ** for each 3 dc cluster to the end. Join to the 1st fpdc.
- Ch 2, skip 1, work 3 dc cluster into next st (which should be the sc from the previous round that was made into the middle dc of the 3 dc cluster. This ensures the pattern lines up), skip 2, *3 dc cluster in next sc, skip next 2* Repeat ** to end. Join to 1st dc.
- Ch 2, *fpdc in 1st dc, sc in 2nd dc, fpdc in 3rd dc* Repeat for ea 3 dc cluster to end. Join to 1st fpdc.
Repeat rounds 5 & 6 until desired length is reached. Approx 10″ or more which should be anywhere from 10 – 13 rounds of repeats to achieve a slouchy hat
- Ch 1, hdc into next st and each stitch around to end. (Continue on below for optional hat rim finish.) Finish off.
Weave the beginning tail in through beginning chain loops around to the end. Finish off.
**OPTION FOR FINISHING BOTTOM RIM OF HAT**
If you would like a stretchy ribbed bottom of hat, you can repeat the following for 3-4 rows, just remember that it will extend the length of your hat so measure accordingly keeping this in mind:
**Ch 2, fpdc around 1st dc from previous round, bpdc around next dc, fpdc around next, bpdc around next, continue alternating these stitches to end of round, join to the 1st fpdc.**
Again, you will repeat this for 3-4 rows or until desired length is achieved, making sure to work your next row of fpdc over previous fpdc and bpdc over previous bpdc.
Sizing
Note: The hat I worked up in the full video tutorial linked above could fit size 18-22″ head using the tools listed. This gives you an idea of the stretch factor with these stitches along with a bigger hook size.
If you need larger than 22″, I suggest adding the following round before moving on to round 6 for beanie:
Ch 2, 2 dc into same chain space, 1 dc into each of the next 4 st, *increase in next, 1 dc into next 4 st* Repeat ** to end. Join to 1st dc (72)
For smaller than 18″ (Infant, baby): skip round 5 and continue onto round 6 of pattern.
See chart below for hat length (crown of head to bottom of ear) information:
Baby length: 5″ – 6.5″ | Child length: 7″ – 7.5″ | Adult length: 8″ – 9″
♥♥♥♥♥♥♥♥♥♥♥♥♥♥♥♥♥♥♥♥♥♥♥♥♥♥♥♥♥
Make sure if you have any questions at all to take a look at the video tutorial linked above. I answer all comments on videos so make sure if you have a question you post it =)
I am very active in our YarnWars Facebook group, so that is another great place to get support if you have any questions on one of my patterns! just tag my name so I see it right away! (Colleen Hays)
I would love to see your Stormy Waters Hat or any of your other creations! Come join us over at YarnWars on Facebook or Like our YarnWars Facebook Page and comment in the Stormy Waters Hat post with the picture of your work up!
Subscribe to my YouTube channel! You’ll be the first to know when a new YarnWars pattern video is released!
Follow us on:
Have an amazing day & happy yarning, my friends!
![]()


I saw the video a couple days ago and saw that there was a written pattern available and it is so nice I knew I had to make one. I made mine with Lion’s Scarfie in the cream/black colorway and used a 5.5mm hook because I seem to crochet loosely.It turned out absolutely beautiful. I wish I knew how to post a picture. Thank you so much. I will make more for my 14 grandchildren and 5 great grands
Thank you so much Rugh! I would LOVE to see a picture of your project! You can post it in our Facebook group if you are a member there.
http://www.facebook.com/groups/yarnwars
♥
I’m looking to do this pattern for a blanket, how many stitches are worked in multiples? This is such an elegant stitch pattern
Thank you so much Melissa! You can work this in multiples of 3. starting, I would say, with no less than a 9 chain foundation. Have a wonderful evening!